
MIMO 200
Instruction Manual

A. Preparation
Have the Required Tools for the job.
We recommend bringing a laptop or tablet to follow these instructions during the PM. You can also print these instructions, if needed.
Need other questions answered? See our Reference Guide.
If you run into any issues, first contact KSG at 720-370-2760.
B. Arriving On-Site
Check-In within the FN mobile app when you arrive on site.
Call MIMO Tech Support to check in with them: 888-505-6466, Option 9.
Head inside to the front desk to find a manager or, if it’s a retail location, a store associate near the cash registers. Ask for a Manager and let them know you are there to “complete a Preventative Maintenance cleaning on their MIMO cash recycler.” You can also find the site’s contact name in your work order under Store Contact. The manager will take you to the MIMO recycler, which is typically located in a cash office. If a manager wants to reschedule, you must contact KSG immediately.
Once in front of the MIMO recycler, notify the manager this PM could take 2-3 hours to complete and let them know to run additional backup tills for their employees, if needed.
📷 Take a before photo of the entire recycler. Then take a photo of each MIMO Serial badge: Note Recycler badge is behind the red door and Coin Recycler badge is on the outside left-side of of the machine (Upload all 3 to FN work order).
Get the Manager’s Name that will be staying with you (put in FN work order).
Remember…
NEVER touch the cash.
NEVER be in the room alone. If manager leaves, you are required to pause and leave too. Document your time on hold.


C. Open Machines & Power Off
Have the manager open the doors for both the Note Recycler (cash) and Coin Recycler. Lift up the red top lid to the Note Recycler.
Note Recycler is always on the right, Coin Recycler is on the left. If there’s a unit in between them, that’s a deposit safe that you don’t clean.
With door open, look inside the Coin Recycler - if any of the coin hoppers are completely full of coin, ask the manager to run a coin audit to reduce the amount in the recycler. This will make it much easier to clean.
Turn off the DC power for both recyclers. The Note Recycler has a red power button inside of the machine, to the upper left. The Coin Recyler has a red power button on the outside left-side of the machine.


D. Clean the Note Recycler
D1. Remove Cassettes
With the Note Recycler door open, push on the green lever at access point 71 on the right hand side of the note recycler to release the Lower Module with the cassettes. Rack it all the way out by pulling on the handle at access point 72.
Lift each cassette out one at a time (green handles) to remove. Place all cassettes aside from the MIMO. Make sure to place them in order so they can easily be returned to the same location at the end of the cleaning. Note: The deposit cassette may be locked in place (if so, leave it in the Lower Module).
For each cassette, only clean the outside of the cassette (do not ask the manager to open them). Blow out the entry slot on the top of each cassette, then wipe down the outside with a damp microfiber cloth.
Note: Anytime it’s mentioned to use a damp microfiber cloth, only use one spray of water to very lightly dampen the cloth. Never spray any water towards or inside of the machine.
Rack the emptied Lower Module back into the recycler. It will lock into place when it is completely racked in.


D2. Shutter
To rack out the note recycler, press the green latch at access point B-25 located to the right of the unit (if label is missing, it’s the metal latch about 6” above access point 71), while pulling on access point 72 located at the bottom of the front of the recycler.
Lift access point B-8 until the FD module is in the locked position. Ensure that the gas strut at access point B-12A is locked. Then lift access point B-12B to open the Shutter.
Using a ShopVac, blow out the area around the Shutter. Then clean the outside of the Shutter with a damp microfiber cloth (one light spray of water).
Turn the green manual knob clockwise (left side of Shutter) to open the Shutter and clean the rails on the rear side of the Shutter using a damp microfiber cloth. Close the shutter when complete.


D3. FD Module
Lift access point B-5. Blow out this area of the FD Module.
Turn B-1 counterclockwise until it stops, then use a plastic scraper on the 2 metal rollers to clean them. Turn knob B-18 counterclockwise to aid in the cleaning of the metal rollers.
Use a damp microfiber cloth to clean the black rubber rollers, turning knob B-3 to aid in cleaning. Then blow out the area once more after cleaning the rollers.
Pull down on access point B-9 (in the front) and blow out this area. Then release B-9 and push to return to its closed position.


D4. Escrow
Open and hold access point B-15. Blow out this area behind the clear access door. Gently release to allow B-15 to close.
Blow out the area at the front of the Escrow, focusing on the belts and rollers. Remove any bill remnants and debris with small pliers, if needed.
Using a damp microfiber cloth, wipe down the belts in the front of the Escrow.
Lift access point B-13 and hold until it locks into the open position.
Lift and hold access point B-23, then blow out this area. Release to close access point B-23.
Blow out the area around all belts located on the Lower Transport (in front of B-24), then gently wipe down the belts with a microfiber cloth. Turn the large knob B-6 clockwise to turn belts while cleaning. Note: Be careful not to push belts off track!
Lift and hold access point B-24 and blow out this area. Wipe down all belts in this area using a microfiber cloth. Turn the large knob B-6 clockwise to turn belts while cleaning. Release to close access point B-24.


D5. Bill Validator
Locate the Bill Validator at access point 17 (plastic green latch). Pull on 17 to hold open the Bill Validator.
While holding 17 open, blow out the area within the Bill Validator and also back through the fan on the side of it.
Close the Bill Validator and make sure the latch at access point 17 is closed.


D6. Reject Bin
At the back of the unit, push down on the green lever at access point 63 beside the Reject Bin (This will release the Reject Bin). Pull up on the the handle to remove the Reject Bin.
Clean the outside of the Reject Bin by blowing out the bill entry slot and wiping it with a damp microfiber cloth.
Push down and release the green lever at access point 61 (found below the Reject Bin slot) and lift access point 64 until it locks open to gain access to the lower transport belts. Blow out this area under the Reject Bin slot.
Lift and hold the green lever at access point 65 (on the right side), then blow out the lower transport belts as well. Release lever 65 to close.
Using a damp microfiber cloth, wipe down all the belts throughout the Reject Bin area.
With the entire Note Recycler completely open at this point, complete a brief once-over with your ShopVac to blow out all open areas.
📷 Take a photo of the Note Recycler showing the machine completely open and cassette bins empty (see last sample photo below).


D7. Clean Sensors and Prisms
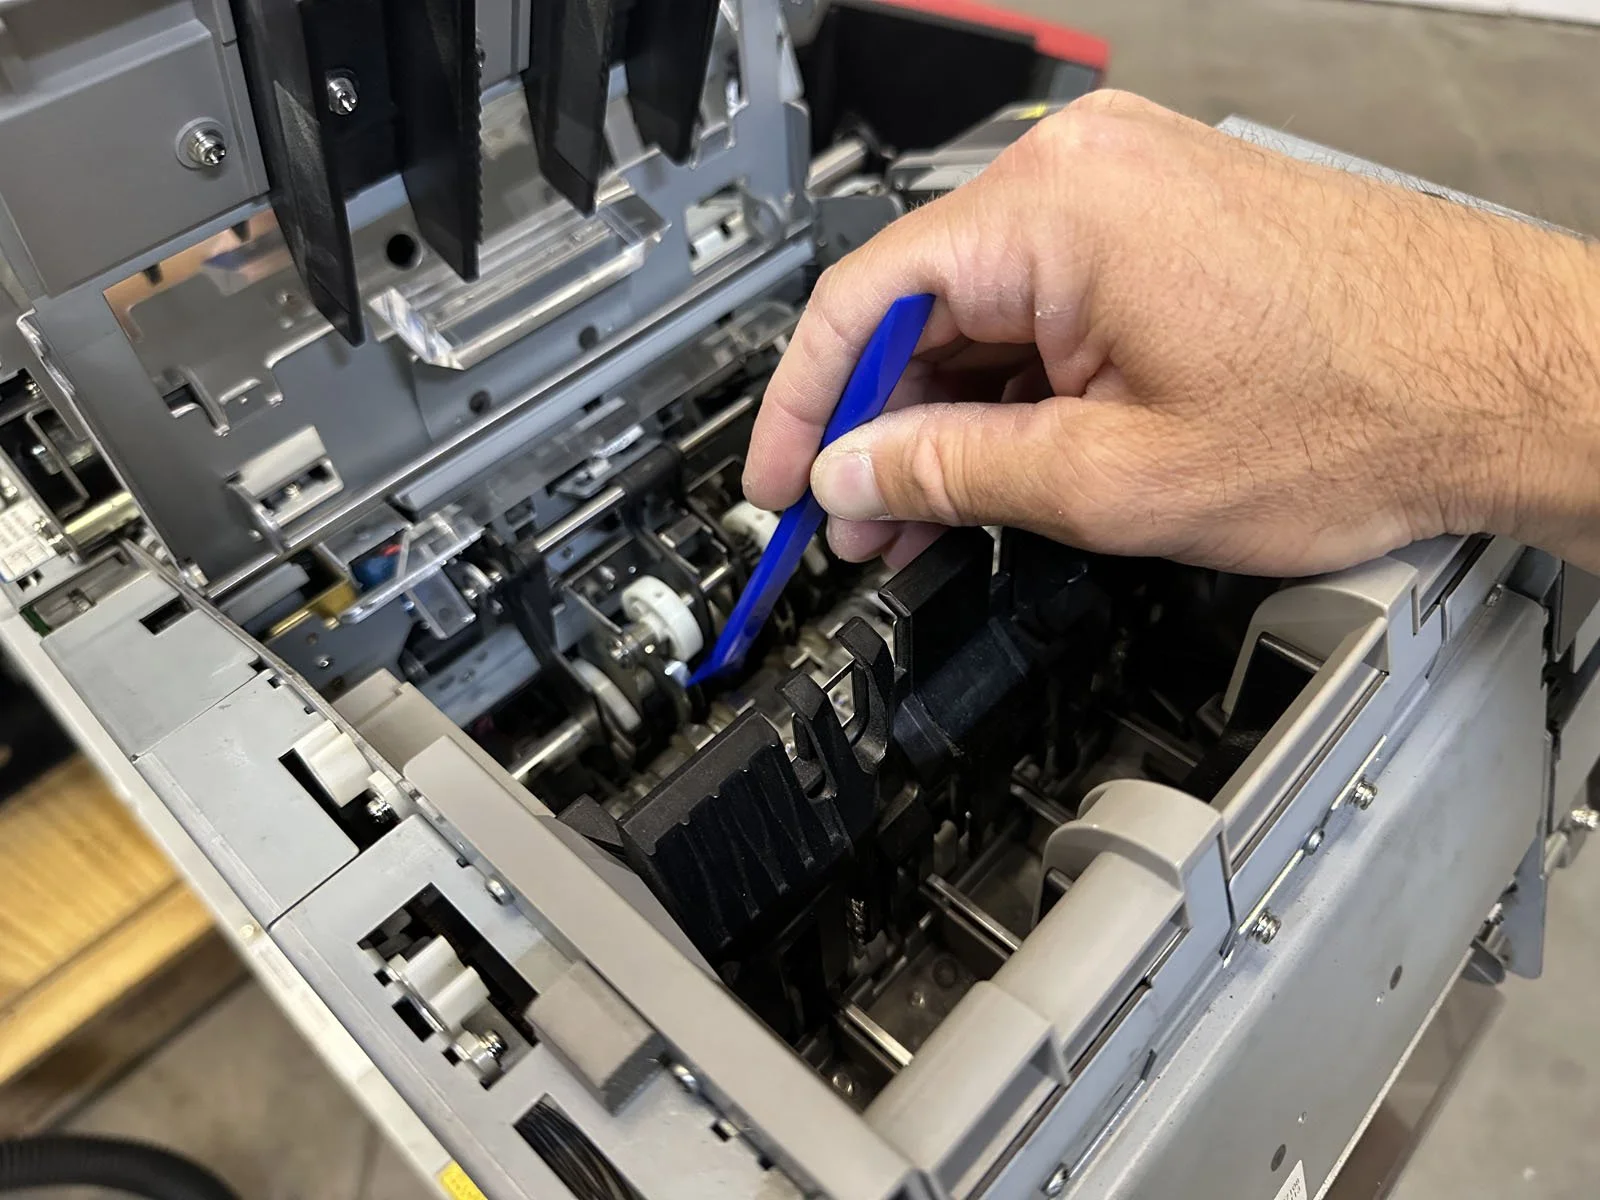
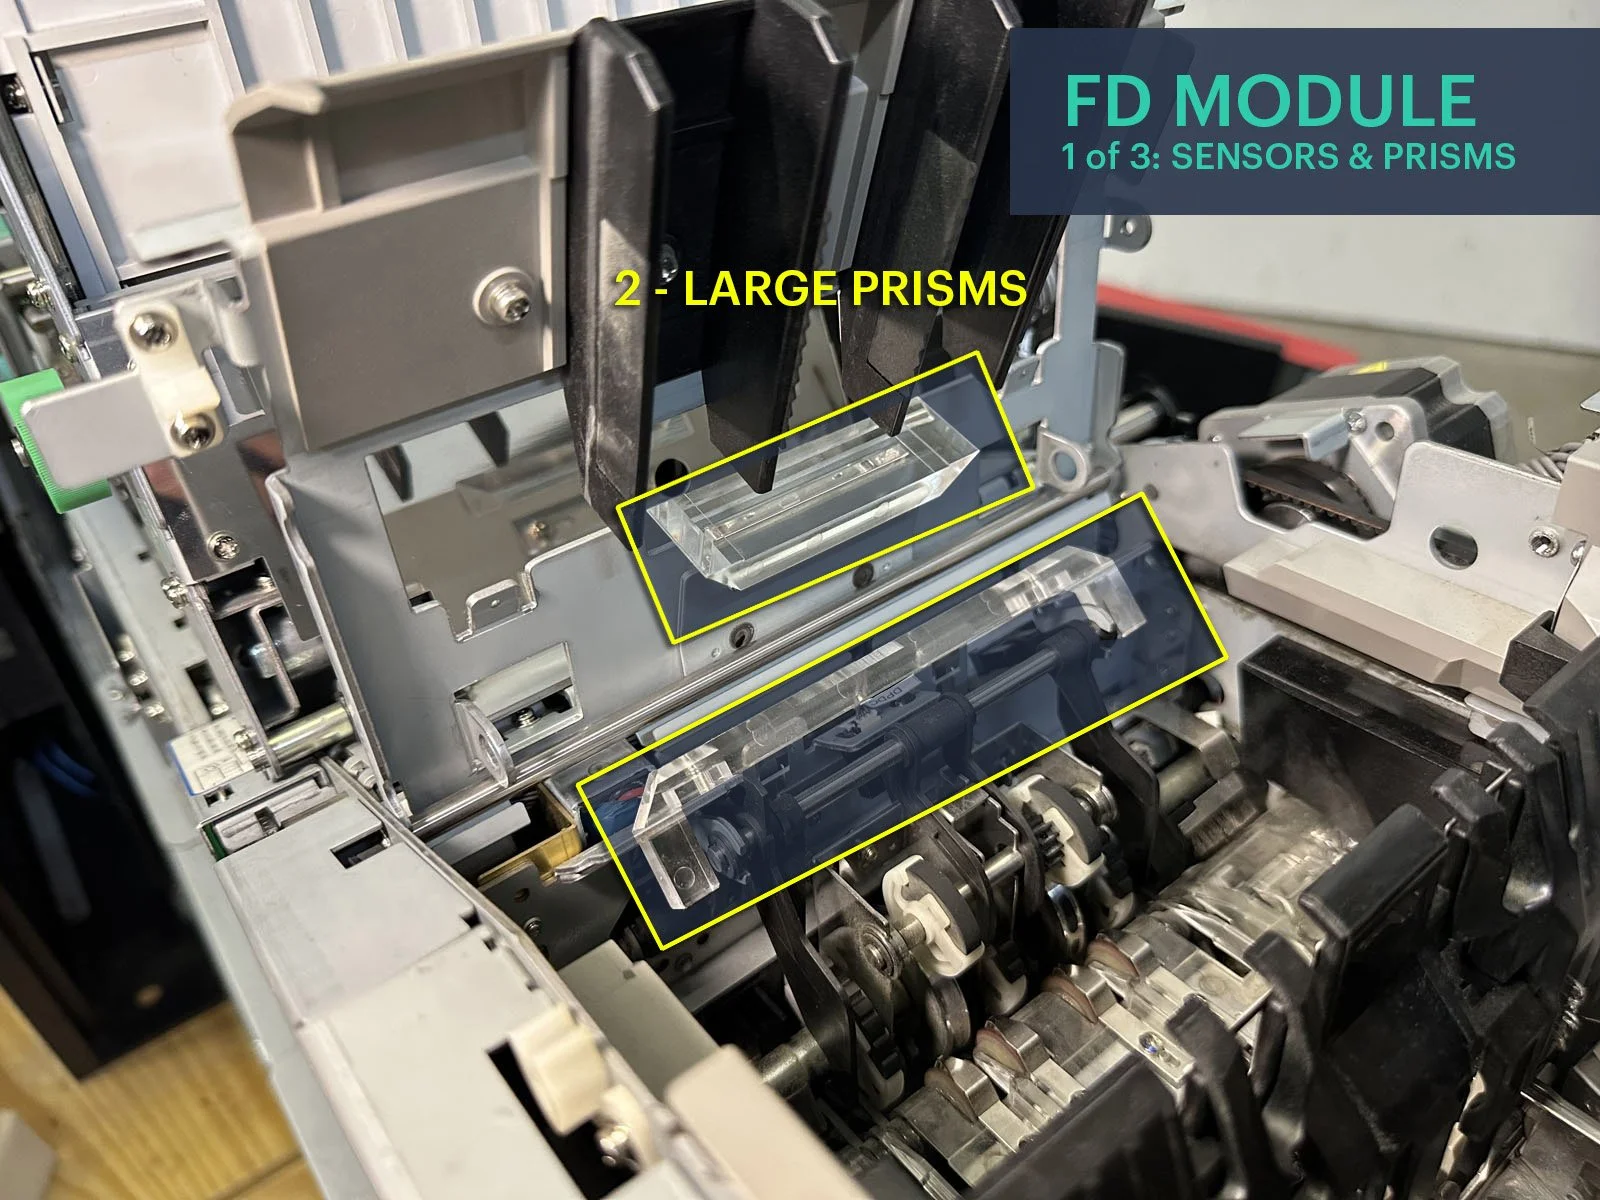
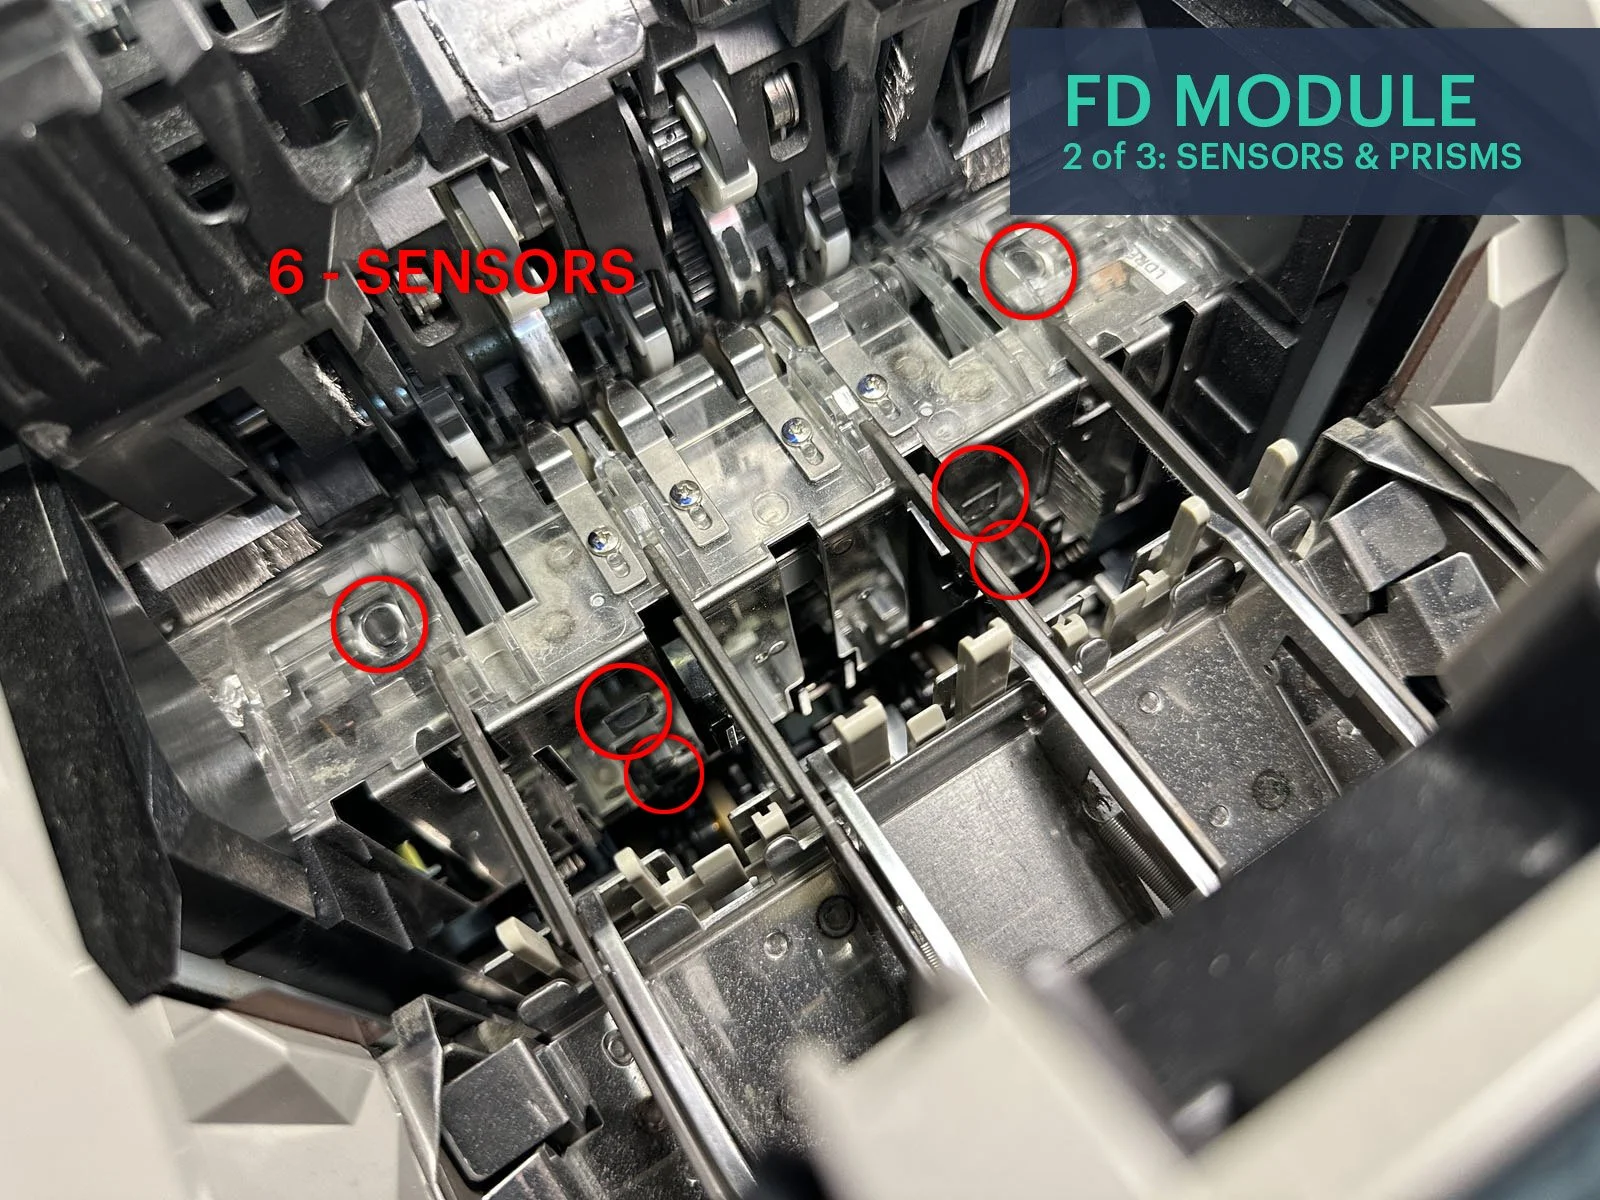
Using a dry cotton swab (or foam swab), clean all the sensors and prisms throughout the Note Recycler. For each one, briefly rub the dry cotton swab back and forth over the sensor and prism, making sure not to touch them with your fingers. The sensors looks like small round glass beads, one is usually clear and the other one is black. The prisms are square and always clear. These can be hard to find, so look at the photos below and try your best. Tip: you’ll always find the sensors in pairs, then the prisms are located opposite of them.
Shutter: 2 sensors and 2 prisms.
FD Module: 12 sensors, 2 large prisms. Rotate B-1 for easier access to the sensors.
Escrow: 4 sensors, 4 prisms.
Reject Bin Area: 2 sensors, 2 prisms.
Underneath Lower Transport: 10 sensors, 10 prisms. Above each of the 5 cassette slots, there is a set of 2 sensors and 2 prisms on the underside of the Lower Transport.


D8. Close up all Access Points
At the back of the unit, pull up on access point 64, then release the lever at access point 62 to return the Reject Bin area to it’s original starting position (be sure the latch at access 61 is locked). Grab the Reject Bin and place it back into its proper locked position by pushing towards the front of the unit.
In the Shutter area, close access point B-5 until it snaps closed. Then close access point B-12B to ensure the Shutter is in its starting position.
To close the FD Module and Escrow, slightly lift up on B-8 while pushing down on access point B-12A to release the gas strut, then push down on access point B-12B until it locks into the closed starting position (be careful not to press down on the Shutter itself). All access points should now be closed up.


D9. Place Cassettes Back
With all components back in their starting position, rack the Recycler back into the cabinet with the handle at access point 72 until it locks into place.
Push on access point 71 on the right hand side of the Note Recycler to release the cassette rack. Use access point 72 to pull out the cassette rack.
Switch your ShopVac over to vacuum mode. Most of the debris and dust you’ve been releasing will have fallen to this area - do not blow it out of here, but make sure to vacuum it instead. Vacuum out the floor of each cassette slot and the entire floor of the recycler behind the cassettes.
Return all cassettes to their proper locations. It is critical they go back into their same slots - match up the cassette numbers or letters with each slot.
Push the cassette rack back into the Recycler. It’ll lock into place when it’s completely racked in.
Close the top lid. Do not fully shut the front door or turn on the power yet - you will need to access the interior power button after you finish cleaning the Coin Recycler.


E. Clean the Coin Recycler
E1. Coin Sorter
On the top of the Coin Recycler, clean the coin Tilt Tray. Vacuum out the Tilt Tray first, then wipe it down with a damp microfiber cloth. Lift up the Tilt Tray and clean underneath it was well.
Remove the Tilt Tray by pulling it towards you and it will release from the hinge point.
Clean the coin sorter Rotary Disk with a damp microfiber cloth. Rotate the disk around with your fingers as you wipe a full rotation of the disk. It just needs a light scrub as best as you’re able to.
To the left of the Coin Sorter is a stainless metal access panel - slide it 1/2” to the left. Lift up on the lid of the Coin Sorter to open, then rotate the center black knob counterclockwise to remove.
With the knob removed, lift up the Fin Disk (metal on top, yellow fins underneath). Wipe down the underside of the Fin Disk with a damp microfiber cloth.
Using your ShopVac, vacuum the inside area of the Coin Sorter. Then wipe down the sorting plate with a damp microfiber cloth.
Within each of the 7 slot openings, there are a pair of opposing black sensors on each side of the slots. Use a dry cotton swab (or foam) to clean each coin sensor.
📷 Take a photo of the coin sorter after it’s been cleaned, showing it’s been completely disassembled.
Place the Fin Disk back into place (yellow fins face down), ensuring that it lays flat in it’s position. There is a locating hole underneath that needs to be lined up with a pin to ensure the Fin Disk is properly in place.
Replace the center black knob and rotate clockwise to tighten. Then close the Coin Sorter lid and slide the metal access panel to the right to close.
Return the coin Tilt Tray by pushing it back into it’s hinges.


E2. Coin Hoppers
If the front door of the Coin Recycler was accidentally closed again, have the manager re-open the door at this time. Fully rack out the main Coin Tray by pulling the door all the way out. It does not click or lock into position when fully out.
Remove all of the stainless steel Hopper Extensions and set aside. Note that they match the coin denominations of the Hoppers below them.
Remove all the black Coin Hoppers and set aside.
With all the Coin Hoppers removed, check for coin spillage throughout the bottom of the tray and recycler. Hand any coins found throughout the area to the manager.
Vacuum all of the empty Hopper Bins.
At the bottom of each empty Hopper Bin, inspect the female connectors with pins. These female connectors must be loose, not tight, so that you can slightly wiggle them. Inspect each female connector in each Hopper Bin. If any of them are tight and won’t budge, use a Phillips screwdriver to loosen the two screws until the female connector can wiggle. Loose is correct!
📷 Take a photo of the empty Coin Hopper Bins showing the hoppers removed (see third photo below as an example).
Return all the Coin Hoppers to their appropriate bins. Each one is labeled with the coin denomination to match the correct Hopper Bins. It’s critical they match them same denominations!
Return all stainless steel Hopper Extensions to the top of their appropriate hopper. Each one is also labeled to match the correct Coin Hopper. Ensure they are pushed down into the Coin Hopper openings.


E3. Coin Chutes
Ask the manager for the round cleaning brush provided by MIMO. This is required to clean two coin chutes. If they do not have the supplied brush, skip this entire step and proceed to the next section (do not attempt with any other brush or tool).
Bend down to the left side of the coin recycler and you’ll find the metal coin chutes underneath the hoppers. The first two chutes closest the side of the machine are the only ones that need to be cleaned. Push the brush into each chute and move it back and forth a few times to clean it (do not use any water or cleaner).

F. Turn on Power, Clean Exterior
Press the red power buttons on both the Coin Recycler and Note Recycler to turn both of the machines back on.
The Manager may need to enter the door codes in order to fully close both the Coin and Note Recycler doors. Have them completely close and lock the front doors of both units.
While both machines are restarting, vacuum and wipe down the exterior of both machines using a damp microfiber cloth.


G. Call Out & Manager Tests
Call MIMO Tech Support to check out with them: 888-505-6466, Option 9.
MIMO will ask you to give the phone to the manager so they can walk the manager through running their tests. You do not need to do any tests yourself. While they are running the tests, you can pack up your tools.
Once their tests are complete, get a signature from the manager from within your FN mobile app.
H. Closeout in FN
Check Out within the FN mobile app before leaving the site.
Upload photos to FN.
Answer the following questions in FN: On-Site Manager’s Name? Any Manager Delays? Any MIMO Support Delays? Breakfix Ticket Opened?
Enter Closeout Notes. Include any information about issues you had on site, machine issues that resulted in reporting a breakfix ticket, or if manager’s tests were not successful. If everything went smooth, please keep your closeout notes brief.