
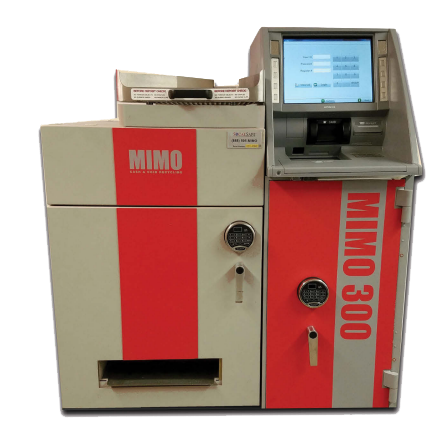
MIMO 300
Instruction Manual
A. Preparation
Have the Required Tools for the job.
We recommend bringing a laptop or tablet to follow these instructions during the PM. You can also print these instructions, if needed.
Need other questions answered? See our Reference Guide.
If you run into any issues, first contact KSG at 720-370-2760.
B. Arriving On-Site
Check-In within the FN mobile app when you arrive on site.
Call MIMO Tech Support to check in with them: 888-505-6466, Option 9.
Head inside to the front desk to find a manager or, if it’s a retail location, a store associate near the cash registers. Ask for a Manager and let them know you are there to “complete a Preventative Maintenance cleaning on their MIMO cash recycler.” You can also find the site’s contact name in your work order under Store Contact. The manager will take you to the MIMO recycler, which is typically located in a cash office. If a manager wants to reschedule, you must contact KSG immediately.
Once in front of the MIMO recycler, notify the manager this PM could take 2-3 hours to complete and let them know to run additional backup tills for their employees, if needed.
📷 Take a before photo of the entire recycler. Then take a photo of each MIMO Serial badge: Note Recycler badge is on the exterior right-side of the machine and Coin Recycler badge is on the exterior left-side of of the machine (Upload all 3 to FN work order).
Get the Manager’s Name that will be staying with you (put in FN work order).
Remember…
NEVER touch the cash.
NEVER be in the room alone. If manager leaves, you are required to pause and leave too. Document your time on hold.

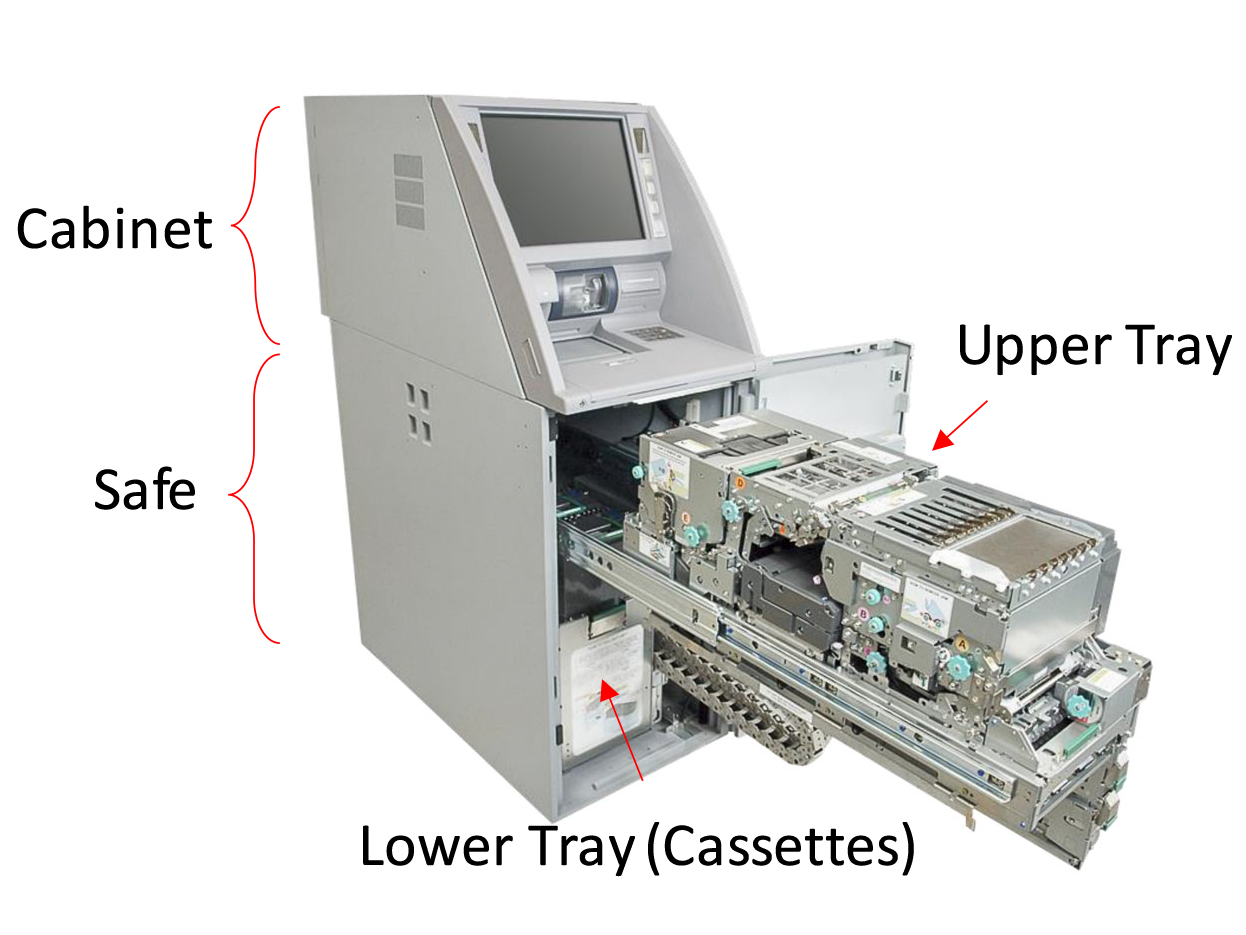


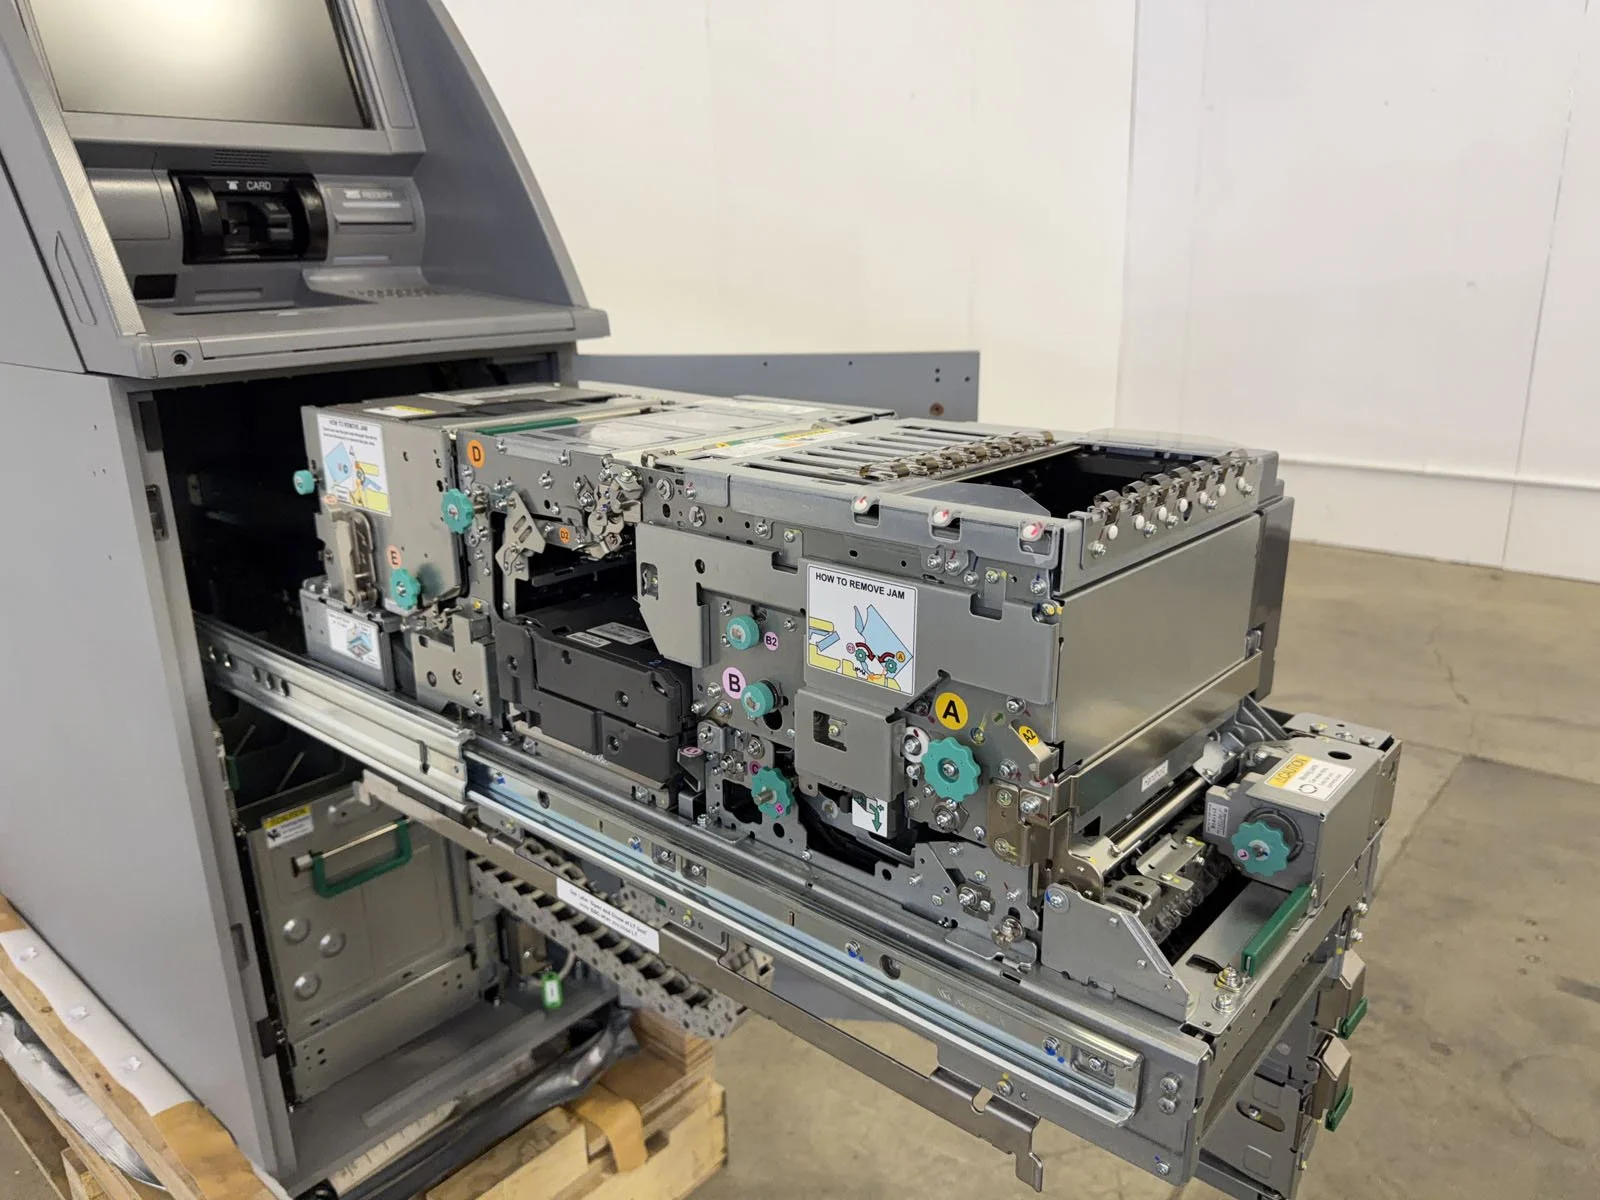
C. Open Machine & Power Off
Have the manager exit the RCM application on the Note Recycler, then they will open the Upper Cabinet using their key.
Note Recycler is always on the right, Coin Recycler is on the left. If there’s a unit in between them, that’s a deposit safe that you don’t clean.
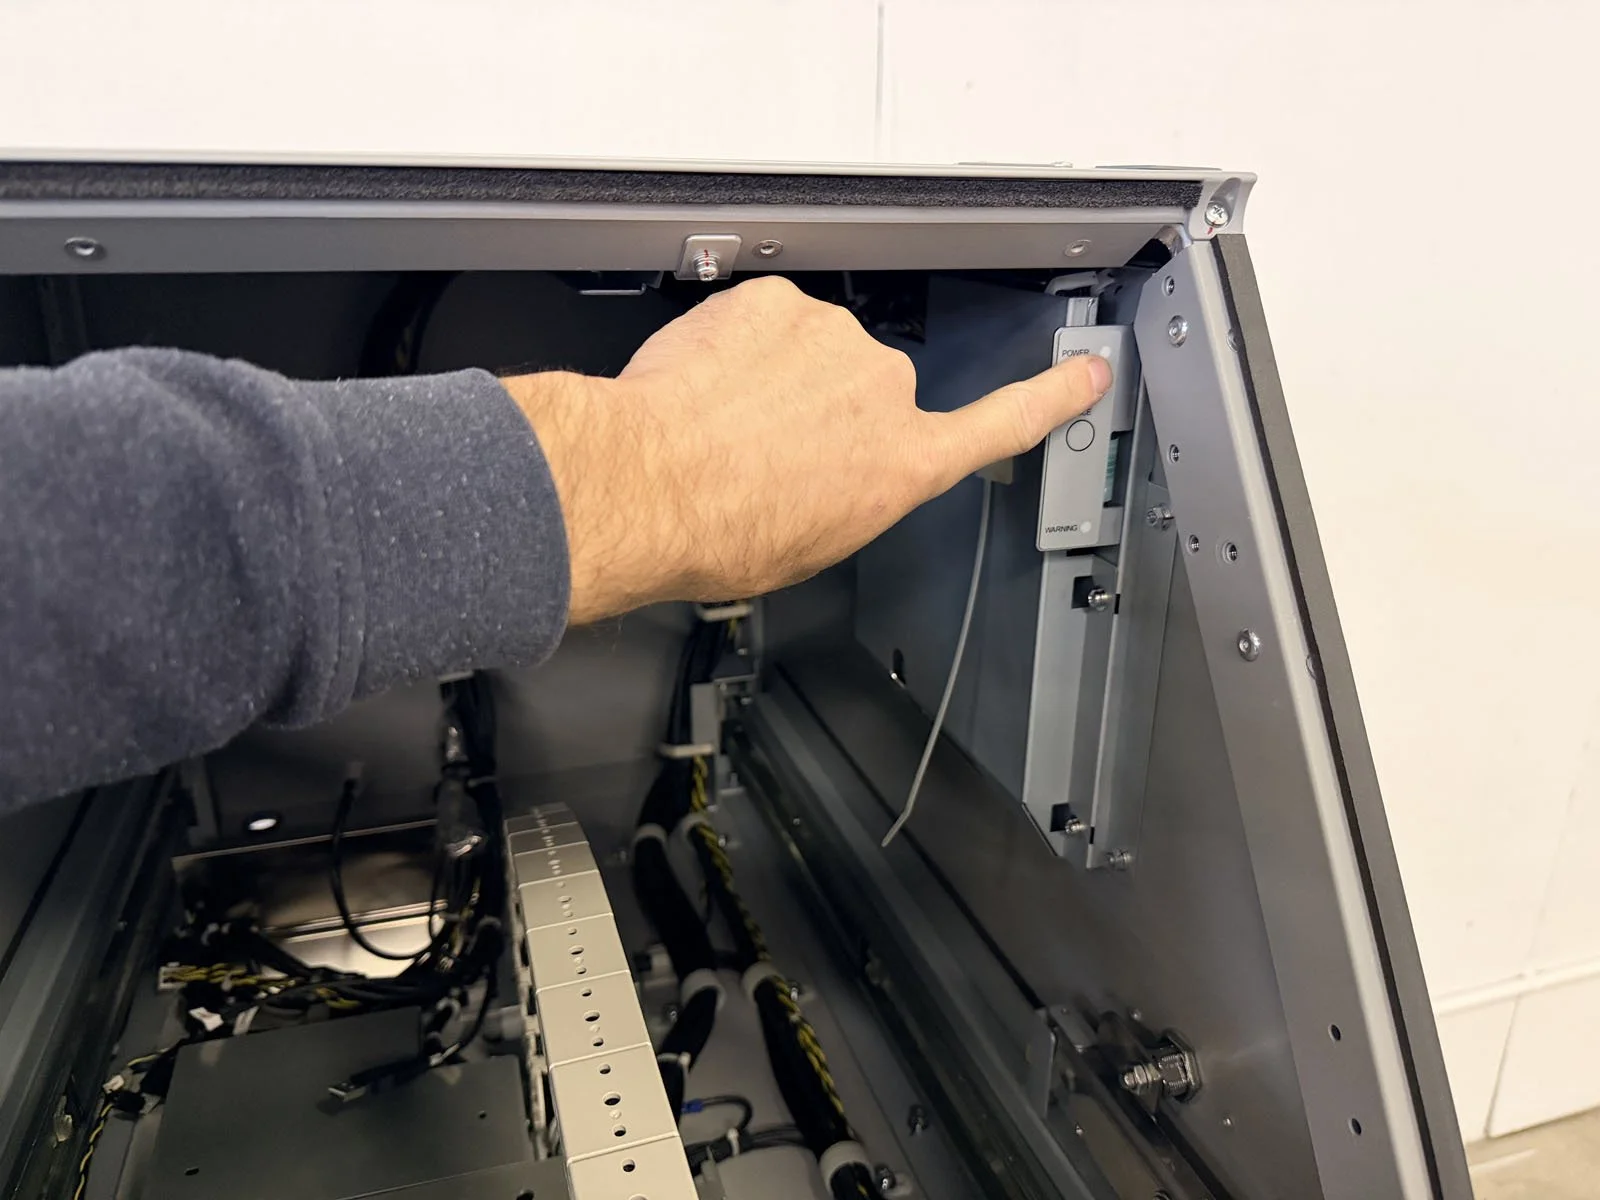
With Upper Cabinet fully pulled out, press the POWER button in the upper-right corner to turn off the Note Recycler system. Confirm the monitor is turned off and the green LED next to the power button has also turned off.
Turn off the Coin Recycler from the red power button on the exterior left-side of the machine.


D. Clean the Note Recycler
D1. Upper Cabinet and Receipt Printer
With the Upper Cabinet already open, vacuum and blow out the back of the cabinet, the printer and the back of the monitor. Then wipe down with a damp microfiber cloth.
Note: Anytime it’s mentioned in these instructions to use a damp microfiber cloth, only use one spray of water to very lightly dampen the cloth. Never spray any water towards or inside of the machine.
Stand on the right-side of the machine, then rotate the paper roll clockwise to pull the paper out of the printer. Do not completely remove the paper roll.
Pinch the “release knob” and slide the entire printer module rearward until it stops. It helps to place your other hand on the back of the monitor while you slide it back.
Open the paper path by pushing the “release bar” and lifting the top cover.
Clean the rubber belt, sensors and cutting area with a damp microfiber cloth.
Lift up the paper path assembly by pressing down the small green “release tab” and lifting up the front of the assembly. It locks into position.
Lift the printer head and clean the surface underneath with a foam swab (this can be difficult to reach with a microfiber cloth).
Push the green Tab B, while lifting up on Tab C, to release the printer back down to its original position. It will lock into place. The move the entire printer forward until it also locks into place.
Insert the printer paper back into the slot, making sure it’s under the black roller bar.
Close the upper cabinet.


D2. Cash Slot (CS)
Have the manager open the safe door for the Note Recycler using the pin pad. Then ask them to unlock the lower tray using their key.
Pull out the Upper Tray by pushing down on the selector tab (left side) until “UP” is shown, then pull the upper green release lever and upper-most green bar at the same time to slide out the Upper Tray. Fully pull it out, but it does not lock into place.
If there is heavy dust on top of the Upper Tray, vacuum it first to remove heavy build up. Then blow out the outer surfaces of the Upper Tray.
On the top of the Cash Slot, press B1 to release the shutter latch, then slide the shutter open with your other hand.
With the shutter completely open, rotate the green knobs (left side) A, B and B2. Inspect the pocket in the note picking area for any loose debris and remove if needed.
Blow out the Cash Slot and then wipe with a damp microfiber cloth.
Rotate knob B2 counterclockwise until the metal separator in the pocket is moved to the front and slides up.
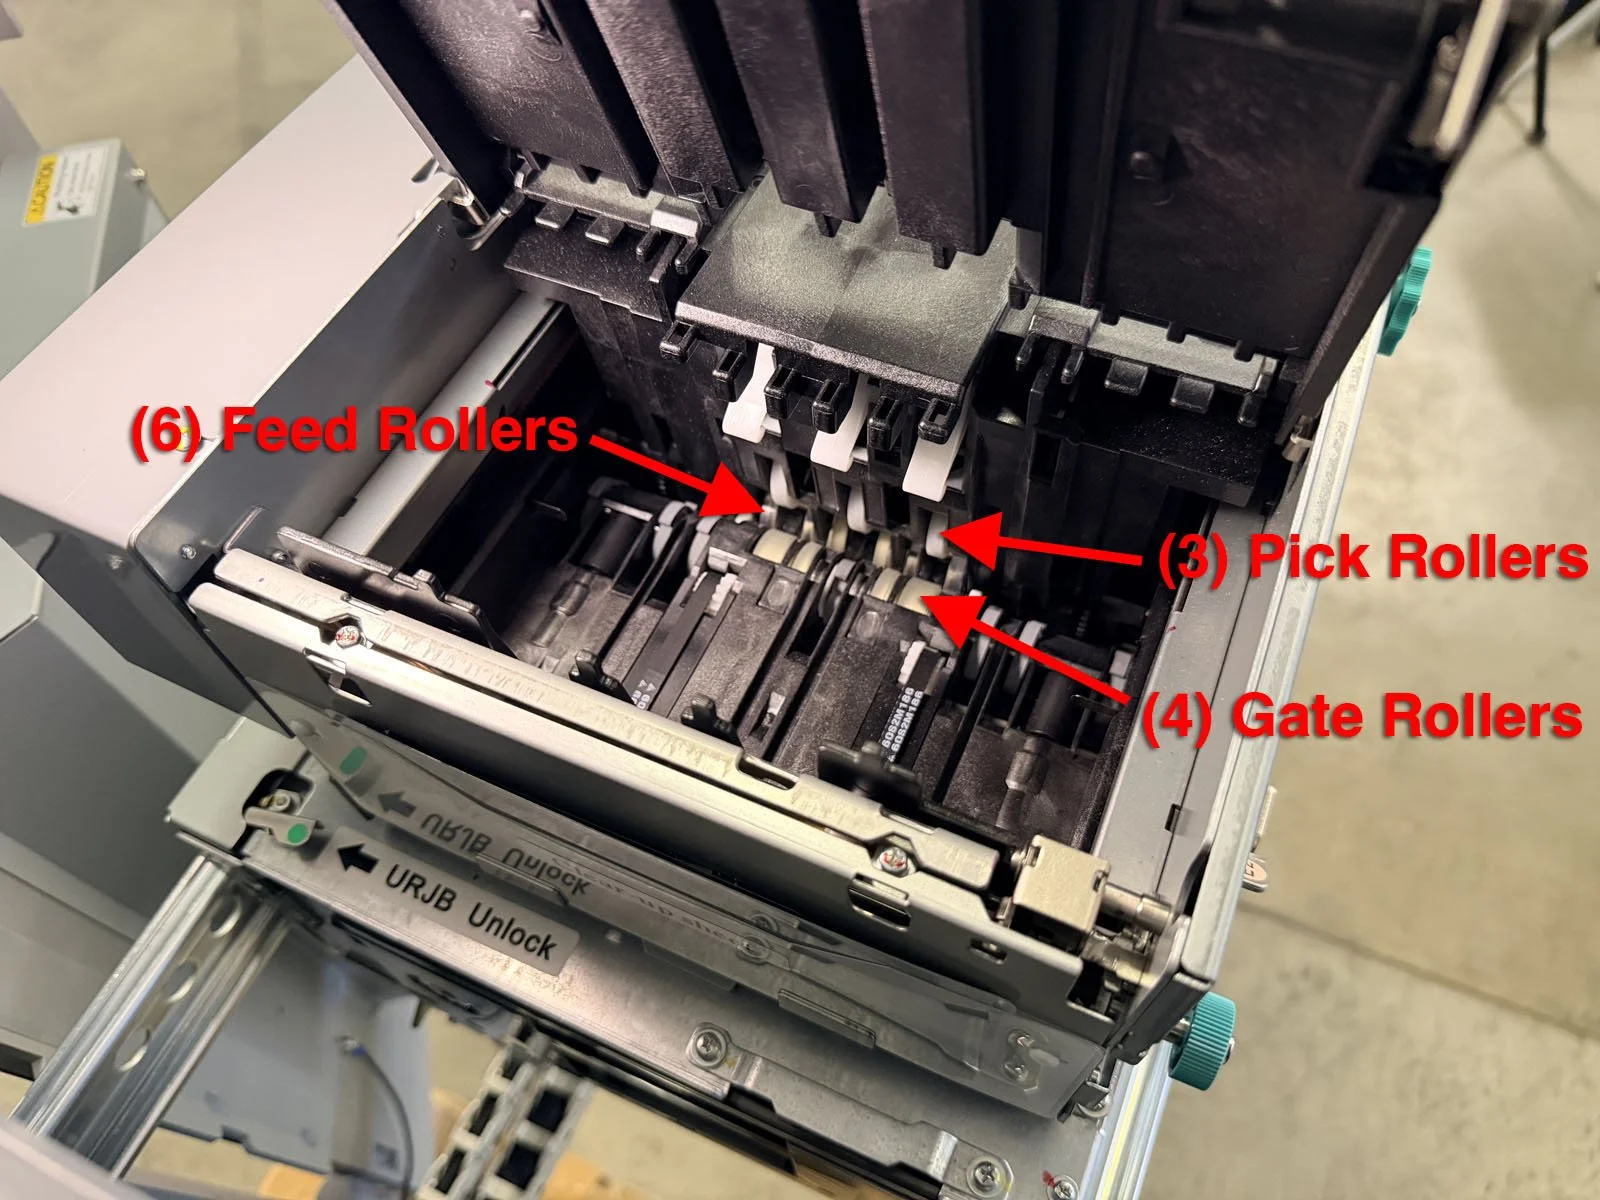
Clean the pick rollers, gate rollers and feed rollers with a damp microfiber cloth. Use knob A to rotate these rollers while you clean.
Close the shutter to the Cash Slot.


D3. Upper Transfer Front (UTF)
Pull up on green tab A1 to lift the Cash Slot up.
Press down on tab B3, then blow out the area and wipe down with damp microfiber cloth.
Lift up on knob C1, then blow out the area underneath and wipe down with damp microfiber cloth.
Remove the dust tray from underneath the Cash Slot by pinching the ends, slide it towards you, then pull down. With the entire tray removed, empty any debris and then wipe it down with a microfiber cloth. Then put the dust tray back into place.
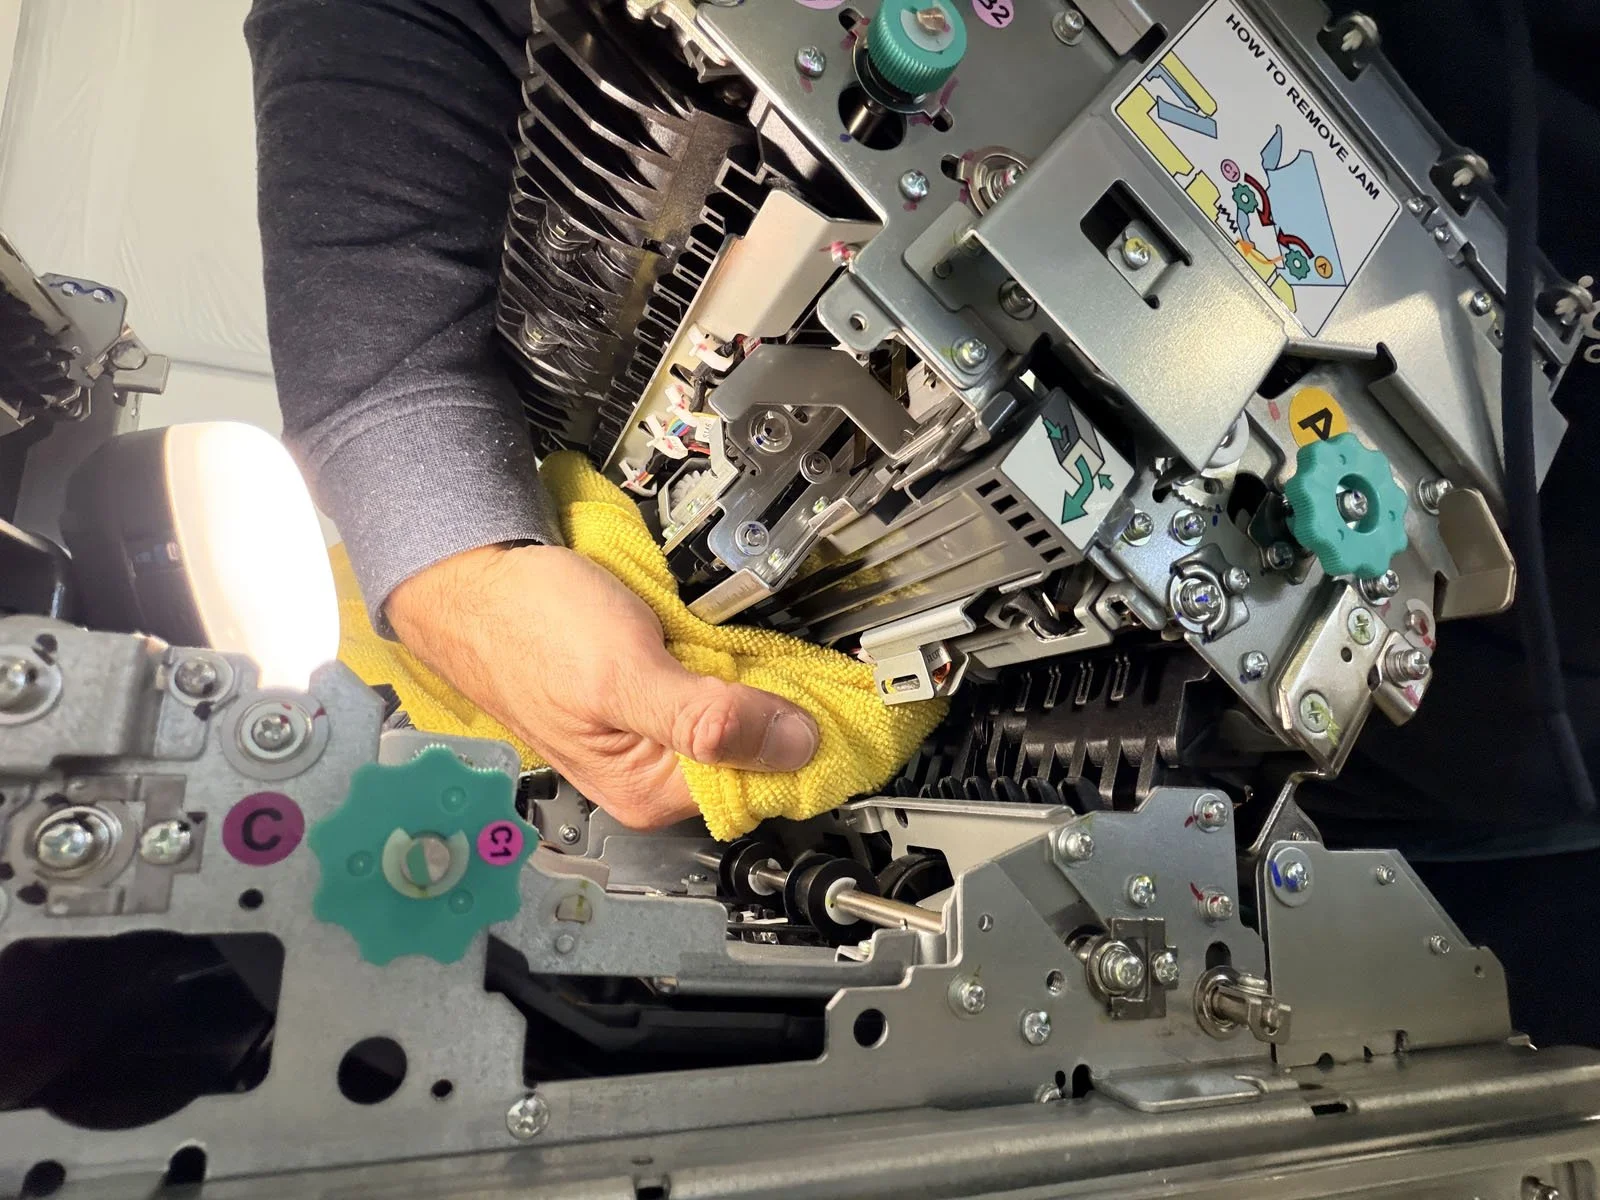
Clean the pinch rollers located underneath the Cash Slot using a damp microfiber cloth. Rotate knob A while cleaning the rollers. The can be hard to reach - we find it best to reach over the top of the Cash Slot to wipe the rollers (see photo).
D4. Bill Validator (BV)
Lift the blue access point 1 to open the Bill Validator. Clean the large sensor with a dry microfiber cloth. BV sensors are delicate - be careful not to scratch them and use a small amount of water spray on your cloth if build-up remains.
Remove the dust tray from underneath the Bill Validator by pinching the ends, then slide it towards you. With the entire tray removed, empty any debris and then wipe it down with a microfiber cloth. Then put the dust tray back into place.
Close the Bill Validator by pushing down on the top of it.
Lift tab D1 to open the UTR, then blow out and wipe down the area. Close the UTR by pushing it back up until it locks into position.
Close the Cash Slot by pulling back on the A1 handhold, then push tab A2 towards you to release and lower the Cash Slot back into place.


D5. Escrow (ESC)
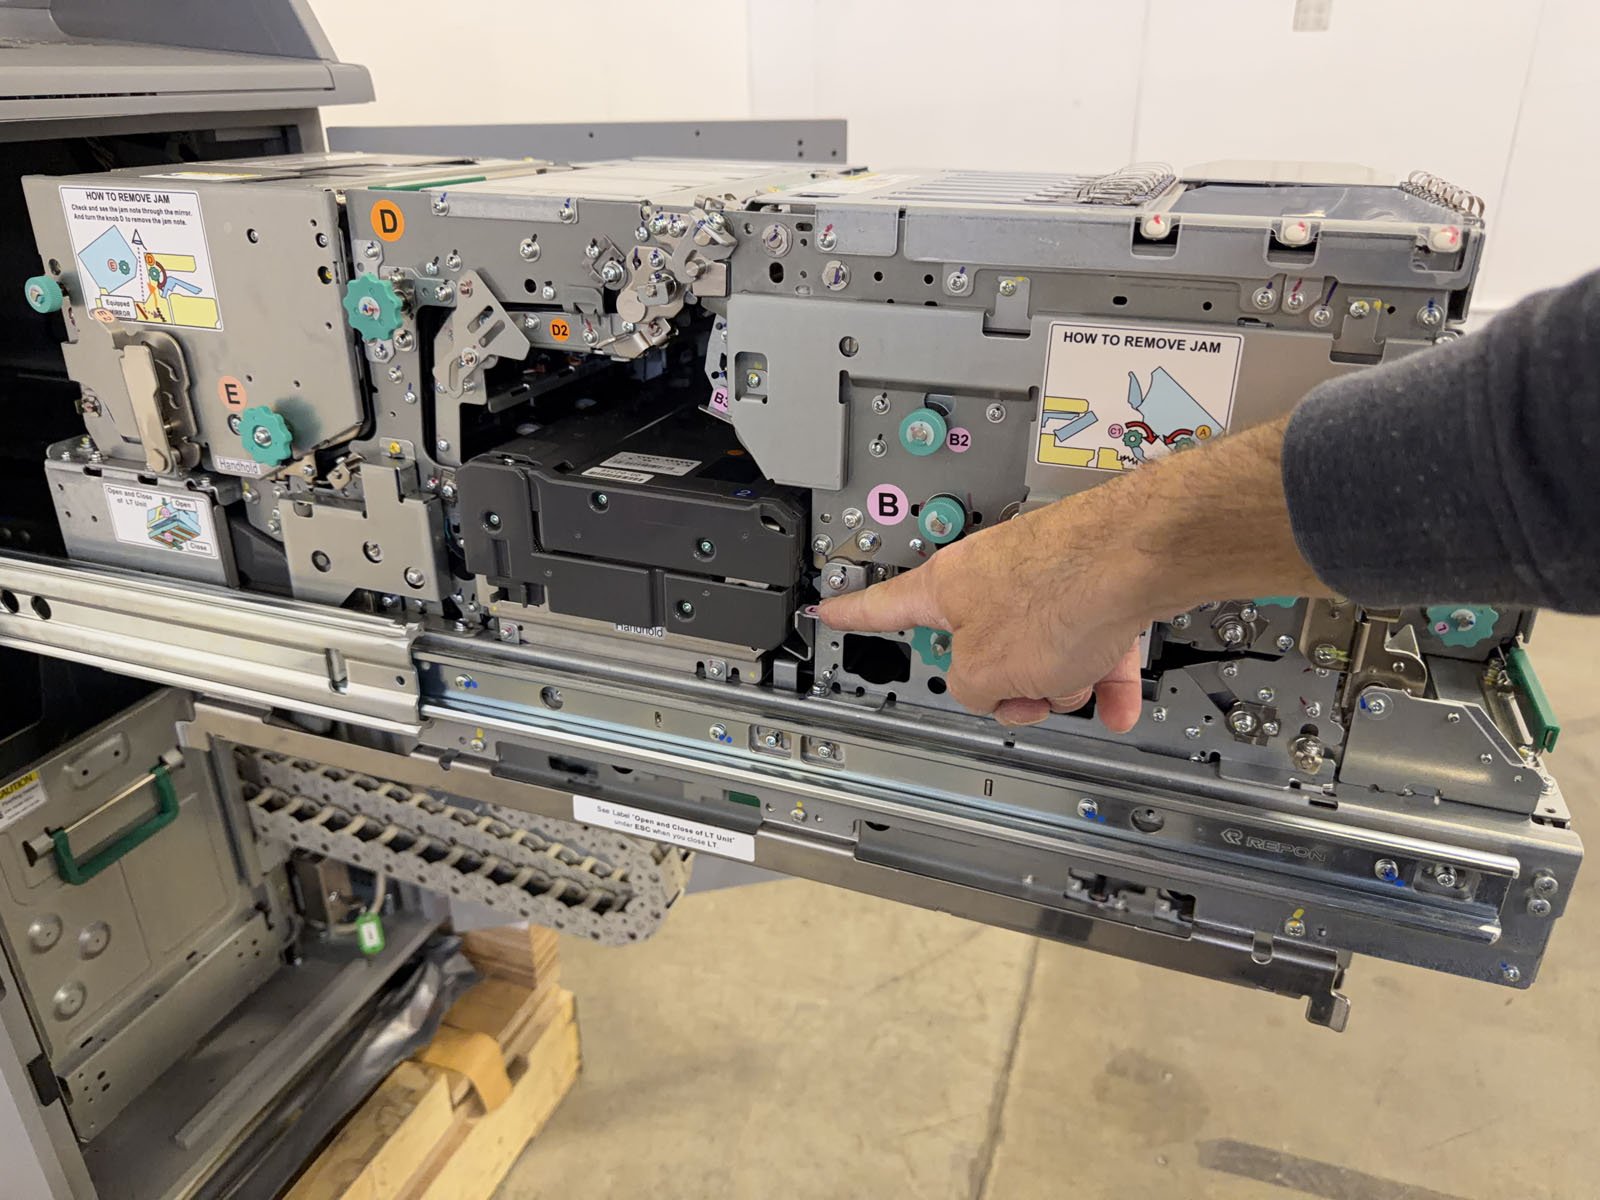
At the rear of the Upper Tray is the Escrow. Lift tab E3 to open the Escrow, then use the green knob to move the pressure plate rearward to expose the note picking mechanism.
Blow out and wipe the Escrow area with damp microfiber cloth.
Clean the pick rollers, gate rollers and feed rollers using a damp microfiber cloth. Use knob E to rotate rollers while cleaning.
Pull up on handle E1 to tilt the Escrow backward, then blow out and wipe down the area underneath the Escrow.
Lift tab E1 and push tab E2 to close the Escrow.


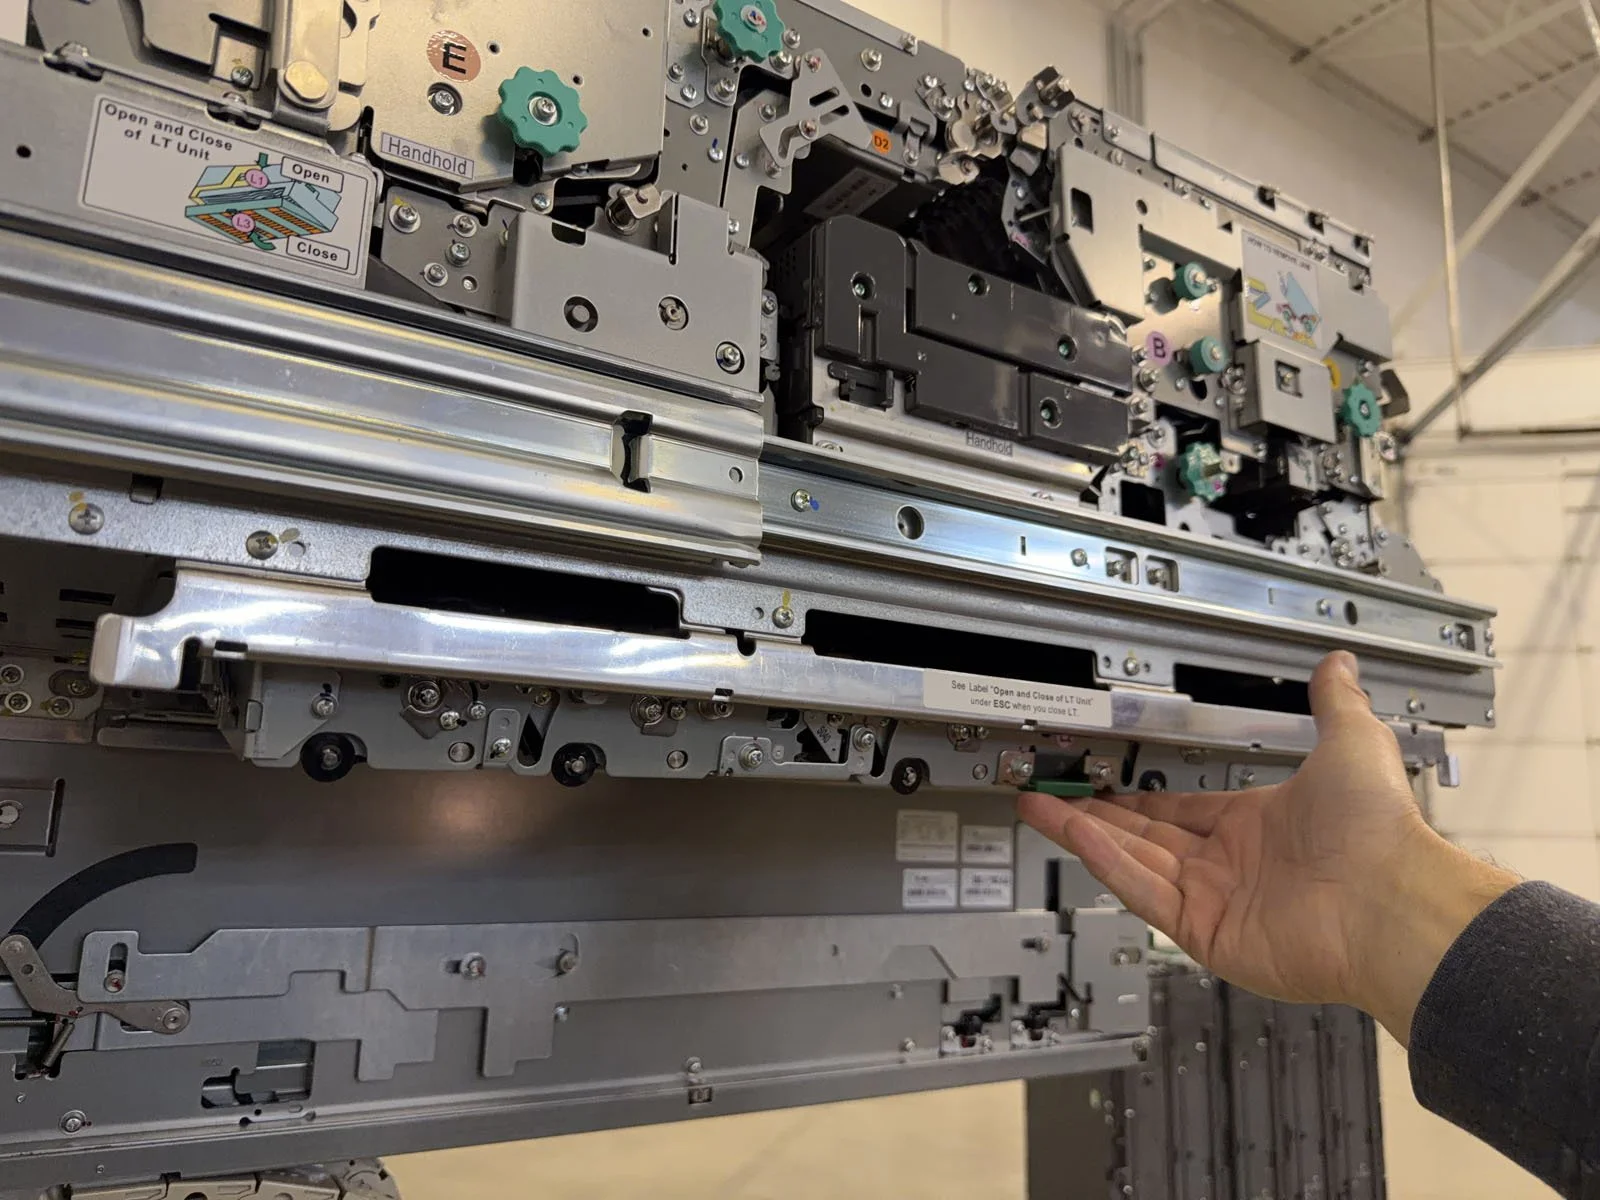
D6. Lower Transport (LT)
Push down on tab L1. The Lower Transport will drop open below the frame rails (underneath the entire Upper Tray).
Check the area for debris, then blow out and wipe the area with a damp microfiber cloth.
Close the Lower Transport by lifting tab L3 (underneath L2) until it locks back into place.
Push the entire Upper Tray back into the cabinet. It will lock into place.


D7. Lower Tray and Cassettes
Lift up the selector tab (left side) until “TRAY” is visible, then pull the lower green release lever and lowest green bar at the same time to slide out the Lower Tray with cassettes. Fully pull it out, but it does not lock into place.
Remove each each cassette one at a time by lifting them up from the lower tray and set aside. It’s critical to make sure you keep the cassettes in order (they must be returned to the exact same location)!
Blow off the outside of each cassette and wipe down with a damp microfiber cloth. You will not be opening any cassettes or cleaning the inside of them.
Vacuum out the bottom of the cabinet and within each empty cassette slot first to remove heavy dust/dirt. Then blow out each empty cassette slot to clean around the connectors and pins at the bottom.
Return all cassettes back into the Lower Tray, making sure they go back in the exact same order.
Push the Lower Tray back into the cabinet. It will lock into place.
The manager can now lock the lower tray and remove their key, then shut the outer safe door.


D8. Reboot and Run Sensor Check
Open the upper cabinet again (manager must use their key if they didn’t already leave it in place).
Press the “POWER” button to turn on the system.
After a successful reset (desktop screen showing), press the “GUIDANCE” button to start the VDA application. Then close the Upper Cabinet door and give the key back to the manager.
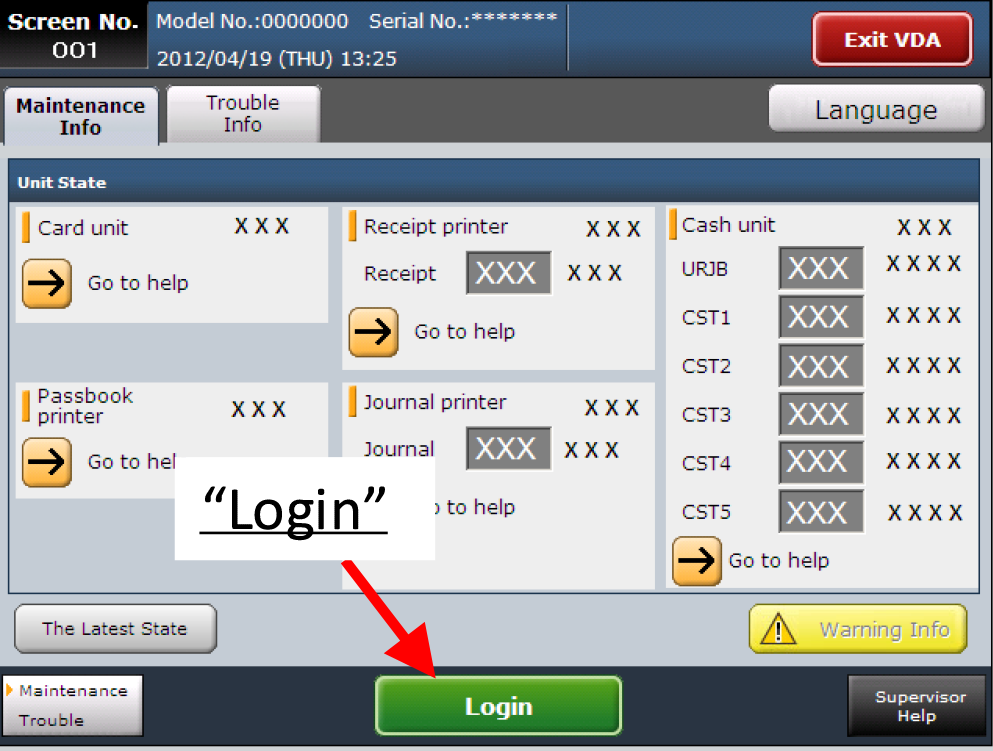
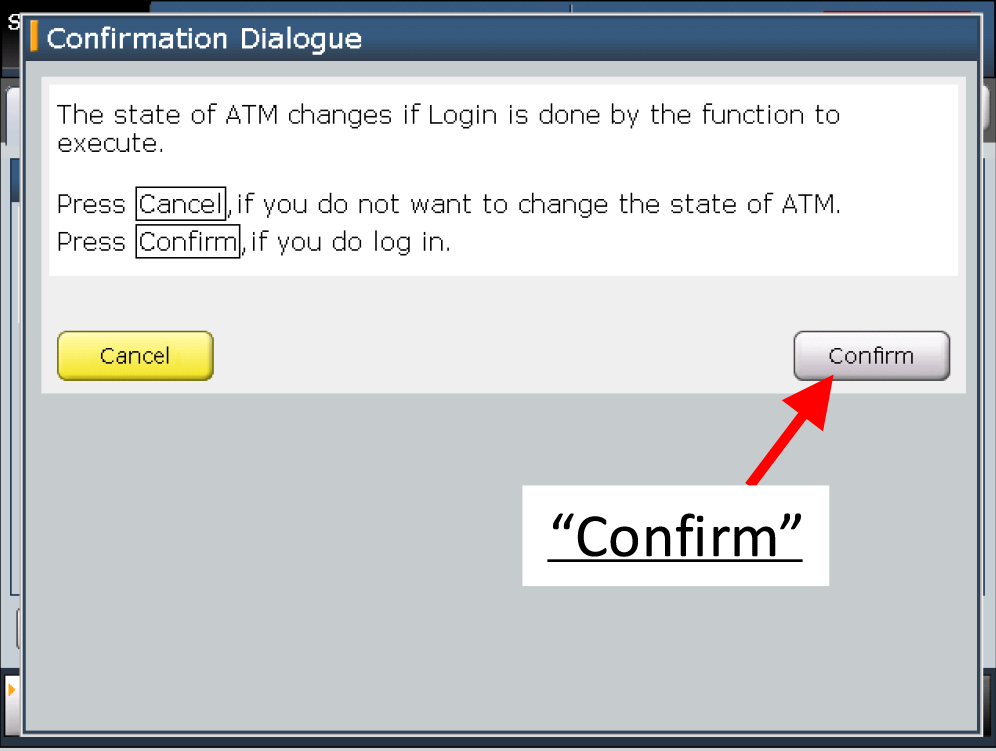
On the screen, press “Login” button at the bottom on the first VDA screen, then press “Confirm'“ on the confirmation screen.
Use “1234567A” for both the ID and login password.
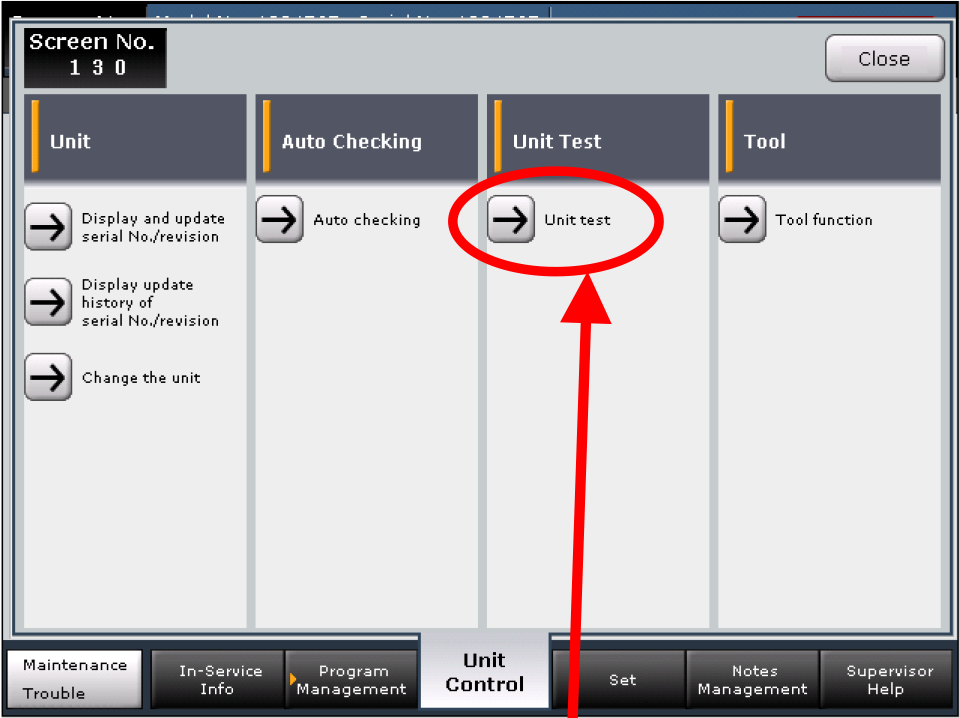
Select “Unit Control” at the bottom tab. Then press “Unit Test”.
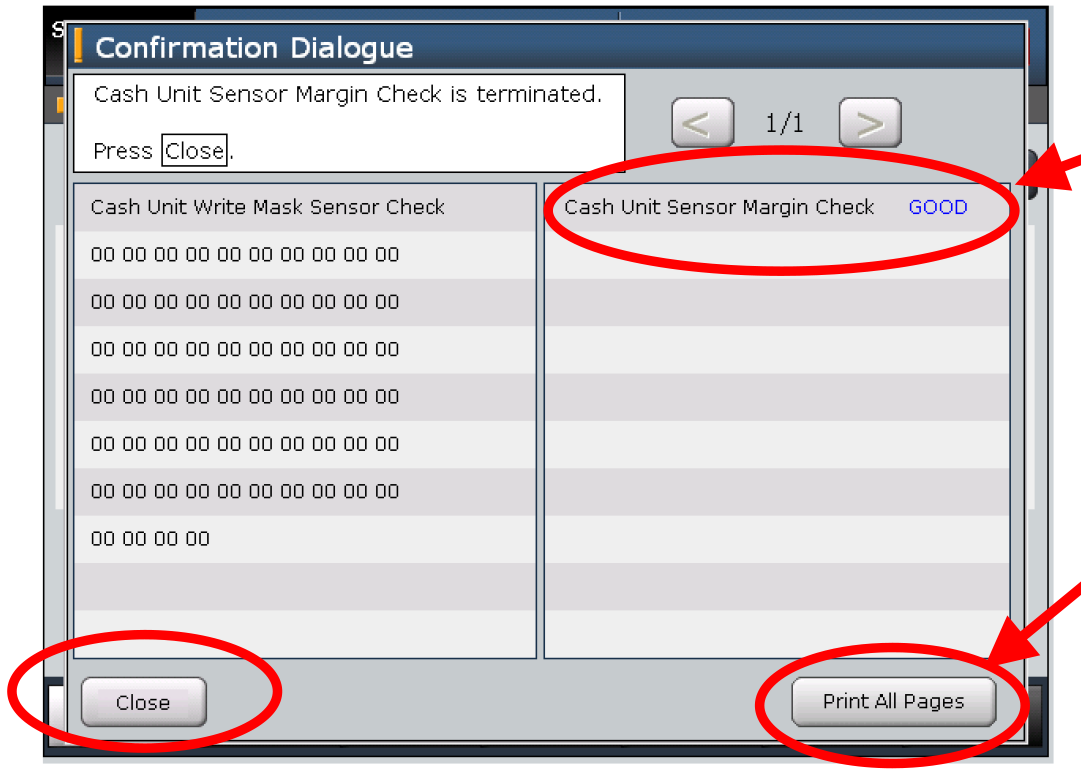
Press the “UR” tab, then “Sensor Margin Check”, then “Execute”. The machine will run the test and check sensor conditions.
The results are displays on the screen (right side of Confirmation Dialogue box). Press “Print All Pages” to print the results and give them to the manager.
• If all sensors are in good condition, the result shows “GOOD”.
• If marginal sensors are detected in the test, the sensor numbers are displayed. You will need to call MIMO Tech Support at 888-505-6466, Option 9. They will walk you through finding any bad sensors and how to clean them. Then perform the check again until all results become “GOOD”.
Press “Close” to finish the test.
Press “Logout”, then “Logout” again on the confirmation screen, then press “Exit VDA”. The Windows desktop should now be displayed.
Start up the User application using the RCM shortcut on the desktop. The shortcut icon may be named either “Start MIMO” or “Start RCM”.


D9. Clean the Exterior
Vacuum and wipe down the exterior of the machine with a damp microfiber cloth.


E. Clean the Coin Recycler
E1. Coin Sorter
On the top of the Coin Recycler, clean the coin Tilt Tray. Vacuum out the Tilt Tray first, then wipe it down with a damp microfiber cloth. Lift up the Tilt Tray and clean underneath it was well.
Remove the Tilt Tray by pulling it towards you and it will release from the hinge point.
Clean the coin sorter Rotary Disk with a damp microfiber cloth. Rotate the disk around with your fingers as you wipe a full rotation of the disk. It just needs a light scrub as best as you’re able to.
Lift up on the lid of the Coin Sorter to open, then rotate the center black knob counterclockwise to remove.
With the knob removed, lift up the Fin Disk (metal on top, yellow fins underneath). Wipe down the underside of the Fin Disk with a damp microfiber cloth.
Using your ShopVac, vacuum the inside area of the Coin Sorter. Then wipe down the sorting plate with a damp microfiber cloth.
Within each of the 7 slot openings, there are a pair of opposing black sensors on each side of the slots. Use a dry cotton swab (or foam) to clean each coin sensor.
📷 Take a photo of the coin sorter after it’s been cleaned, showing it’s been completely disassembled.
Place the Fin Disk back into place (yellow fins face down), ensuring that it lays flat in it’s position. There is a locating hole underneath that needs to be lined up with a pin to ensure the Fin Disk is properly in place.
Replace the center black knob and rotate clockwise to tighten. Then close the Coin Sorter lid and slide the metal access panel to the right to close.
Return the coin Tilt Tray by pushing it back into it’s hinges.


E2. Coin Hoppers
Ask the manager to open the door to the Coin Recycler, then fully rack out the main Coin Tray by pulling the door all the way out.
Remove all the Coin Hoppers and set aside.
Check for coin spillage throughout the bottom of the tray and recycler. Hand any coins found throughout the area to the manager.
Vacuum all of the empty Hopper Bins.
Inspect all female connectors in the Hopper Bins. Inspect all male connectors on the Hoppers. If damage is found, report to MIMO Tech Support at the end when calling out.
📷 Take a photo of the empty Coin Hopper Bins showing the hoppers removed.
Return all the Coin Hoppers to their appropriate bins. Each one is labeled with the coin denomination to match the correct Hopper Bins. It’s critical they match them same denominations!


E3. Turn on Power, Clean Exterior
Press the power button on the left side of the Coin Recycler to turn it back on.
Vacuum and wipe down the exterior of the machine using a damp microfiber cloth.
F. Call Out & Manager Tests
Call MIMO Tech Support to check out with them: 888-505-6466, Option 9.
MIMO will ask you to give the phone to the manager so they can walk the manager through running their tests. You do not need to do any tests yourself. While they are running the tests, you can pack up your tools.
Once their tests are complete, get a signature from the manager from within your FN mobile app.
G. Closeout in FN
Check Out within the FN mobile app before leaving the site.
Upload photos to FN.
Answer the following questions in FN: On-Site Manager’s Name? Any Manager Delays? Any MIMO Support Delays? Breakfix Ticket Opened?
Enter Closeout Notes. Include any information about issues you had on site, machine issues that resulted in reporting a breakfix ticket, or if manager’s tests were not successful. If everything went smooth, please keep your closeout notes brief.